I stumbled across this blog via Oh Joy! and I have decided that this lady can't be real life. She lives a grain, lactose, and sugar free existence and posts those kinds of recipes on her blog. They look amazing but I just don't understand how that even works because I love all of those items. I love them so much so I just concluded it can't be real life.
Anyways, a real post is coming soon as well as the New Year. Crazy!
Dec 26, 2011
Dec 18, 2011
Wrapping Made Easy
L came up with a super cute and easy way to wrap up gifts. See below.

Adorbs, right? These little buddies were made for cookies and other such treats but I don't see why it couldn't be duplicated for regularly wrapped gifts. Keep reading for directions!
Also, photography is not exactly in our skill set (as you have probably noticed) so just know it's on our list of "To Learn".
Dec 11, 2011
A Crap-ton of Errors
We made a bunch of mistakes putting together these new books. In fact, a crap-ton (like stated in the title). We're perfectionists and want to make sure people only get the best so when things don't look right, they get tossed or relegated to another project. For some reason, we didn't take pictures of the sadness so I can't prove to you the errors we made. But believe me when I say there were lots of mistakes. We lost 3 envelopes and 3 sheets of paper in the carnage. While it doesn't seem like much, we're poor people. It matters.
So what do the sad and defeated do? They paint their nails.

Of course.
We've 're on the home stretch finishing some of these books finished some of these books. Stay tuned for pics.
-M
So what do the sad and defeated do? They paint their nails.

Of course.
We've
-M
Dec 4, 2011
Today we didn't cry
We're in progress of making six books! That's right six. Four because people asked nicely and two more because we thought we should and were inspired to do so. After some discussion, L and I think that we will set up this blog site here (yes, this very one) as the platform to order. More to come when we figure out the logistics.

In the meantime, here's our productivity in picture form:

I know we haven't gotten very far, but we are quite appreciative of all y'alls support. Thank you!
-M
Nov 26, 2011
A Post-ish for a Day of Kindas
We're craftin' and we're feelin' something that resembles fine.
I might have mentioned in the previous post selling 4 orders for the recipe books. Muy exciting! Thank you! Thank you! Thank you, dear customers!!
But now we have to assemble them (they are made-to-order!) Remember that whole thing about L and I having wonky non-matching schedules? So, we figure during this long weekend of thanks we should just bust out with ALL four of them, particularly (only) Saturday, today.
Turns out, we don't quite have the stamina for an all day thing.
Here was our goal list:
Line and tab all envelopes
Cover all books
Cut tab inserts
Eat lunch
Blog post
Here is what happened:
Line and tab all envelopes-ish
Cover all books-kinda
Cut tab inserts-yes
Eat lunch-for surely
Blog post-lookit me go!
We're chugging along here but ran into some snags, like ugly envelope liners (not ok for consumers), not having the right envelopes (boo!), buying cards instead of envelopes (we need to learn to read), and hunger.
I guess it's a good time...or something like it. Here's a picture of what we worked on (and have now tossed--it wasn't to standard).

Looking forward to food as usual,
M
Nov 19, 2011
We're Alive!
Hello reader (if you're out there)!
So, there has been a switch in jobs with L, a crazy schedule with M, and a disheartening discovery by a friend of M which has now affected L as well. This little endeavor, however, is still alive as are we.
In fact, it's so alive that we have pictures of our products. Prayer diaries? Fo' sho'. Recipe books? Like no other. We've actually tentatively sold a few of our recipes books to people from L's job.
So here it is...
Are you ready?
Ok, I don't want to hype this up too much to set us up for disappointment. So, meh. Whatev's. You might like it or you might not.
Alright, really really. Here goes...see pictures after the jump!
Aug 25, 2011
dinner party place cards
In the early part of college, a group of friends of mine decided to throw a formal dinner party and me and my friend took that fabulous idea and ran with it. We went all out: we created formal invitations and hand delivered them, we secured a quaint location (friends backyard + tons of twinkle lights), we came up with a fancy menu, and came up with some amazing decorations (i.e. ambiance). The whole endeavor sparked my love my event planning and probably changed the course of my life forever (no, seriously). After that, I was kind of known for dinner parties and would make the effort to plan parties for all the special occasions. There was the ugly sweater Christmas party (a classic), the Valentine's Day dinner party for those of us who didn't have Valentines (not as depressing as it sounds), and my personal favorite "the Joint-Joint Birthday Party" (don't ask about the name).
The Joint-Joint birthday party was a joint effort (pun intended) between me and my friend whose birthday falls 5 days before mine in April. We decided we needed to throw a combined birthday party to celebrate and with a ton of help from my friends we ended up with an amazing dinner party that friends still talk about.
But, this post wasn't intended to simply brag about my party planning skills (that was just a nice perk)-- I wanted to share with you an awesome (and incredibly inexpensive) place card idea that we used for the party that could be taken in so many directions and used for an immeasurable amount of events.

Supplies needed:
-Mini terra cotta pot (roughly $1 from Michael's or JoAnn's)
-Acrylic paint
-bamboo skewers (you can find them at any grocery store)
-Cricut cutter and "Walk in My Garden" Cricut cartridge
-Cardstock/scrapbook paper in various colors
-Foam paint brush (or any large bristled paint brush)
-the essentials: glue, scissors, tape, etc
For these place cards, we painted the terra cotta pots with basic white acrylic paint. Obviously you can use any color you want to match your color scheme for the event. Lay the pots aside to dry and paint the bamboo skewers with a green acrylic paint to look like the stems of flowers.
The daisies were created using a Cricut cutter and the cartridge "Walk in My Garden" ( <daisy1> and shadow option selected to make them thicker). We chose various shades of pink cardstock for the flowers, but again, you can use anything that goes with your color scheme. If you don't have access to a Cricut cutter or that specific cartridge, you can use a variety of stencils or free form drawing to create your flowers. Or, get creative and come up with other shapes to use. A lot of craft stores and scrapbook stores have pre-cut chipboard shapes that could be painted and/or covered and used as well. It just so happens that the Cricut cuts a lot of shapes really quickly and saves you a lot of time. Amazing tool if you have access to one :)
Probably the coolest part of these place cards was the picture we used of each person for the inside part of the flower. This is an optional step since you have their name on another "stem" but it was a really unique and personal touch that we added to each place card. We found each picture from our friends' Facebook albums and used Photoshop to size each picture and make them into circles. After they were printed we used a circle punch to punch out each persons' head (punches= huge time savers!) and was then glued to the center of the flower to complete it
**side note: we printed two of each person's face. The first picture of the person's face was used for the flower place card. The second face we glued on key tags and used as champagne glass drink markers by attaching them to the stem of the glass. This could be a whole tutorial in and of itself, but unfortunately, I have no pictures of them or the process of making them. Sad day. Trust me, they were amazing and a huge hit. They are an awesome idea for any party where you're going to use wine or champagne glasses and don't want your guests to get their drinks mixed up. I used key tags like these ones:
The names were printed on regular paper and glued onto a coordinating color of cardstock and both the flower and the name were attached to the bamboo skewers. I cut the "name" skewer so it was slightly shorter than the flower skewer to add a little bit of dimension.
Lastly, we scrounged up some dirt from our backyard (it doesn't take much to fill the pots) and both skewers were arranged in the dirt. Voila! Amazing little place cards that your guests can take home :)

other pictures from that evening:


 (all pictures courtesy of my amazing friend Ashley)
--L
The Joint-Joint birthday party was a joint effort (pun intended) between me and my friend whose birthday falls 5 days before mine in April. We decided we needed to throw a combined birthday party to celebrate and with a ton of help from my friends we ended up with an amazing dinner party that friends still talk about.
But, this post wasn't intended to simply brag about my party planning skills (that was just a nice perk)-- I wanted to share with you an awesome (and incredibly inexpensive) place card idea that we used for the party that could be taken in so many directions and used for an immeasurable amount of events.

-Mini terra cotta pot (roughly $1 from Michael's or JoAnn's)
-Acrylic paint
-bamboo skewers (you can find them at any grocery store)
-Cricut cutter and "Walk in My Garden" Cricut cartridge
-Cardstock/scrapbook paper in various colors
-Foam paint brush (or any large bristled paint brush)
-the essentials: glue, scissors, tape, etc
For these place cards, we painted the terra cotta pots with basic white acrylic paint. Obviously you can use any color you want to match your color scheme for the event. Lay the pots aside to dry and paint the bamboo skewers with a green acrylic paint to look like the stems of flowers.
The daisies were created using a Cricut cutter and the cartridge "Walk in My Garden" ( <daisy1> and shadow option selected to make them thicker). We chose various shades of pink cardstock for the flowers, but again, you can use anything that goes with your color scheme. If you don't have access to a Cricut cutter or that specific cartridge, you can use a variety of stencils or free form drawing to create your flowers. Or, get creative and come up with other shapes to use. A lot of craft stores and scrapbook stores have pre-cut chipboard shapes that could be painted and/or covered and used as well. It just so happens that the Cricut cuts a lot of shapes really quickly and saves you a lot of time. Amazing tool if you have access to one :)
Probably the coolest part of these place cards was the picture we used of each person for the inside part of the flower. This is an optional step since you have their name on another "stem" but it was a really unique and personal touch that we added to each place card. We found each picture from our friends' Facebook albums and used Photoshop to size each picture and make them into circles. After they were printed we used a circle punch to punch out each persons' head (punches= huge time savers!) and was then glued to the center of the flower to complete it
**side note: we printed two of each person's face. The first picture of the person's face was used for the flower place card. The second face we glued on key tags and used as champagne glass drink markers by attaching them to the stem of the glass. This could be a whole tutorial in and of itself, but unfortunately, I have no pictures of them or the process of making them. Sad day. Trust me, they were amazing and a huge hit. They are an awesome idea for any party where you're going to use wine or champagne glasses and don't want your guests to get their drinks mixed up. I used key tags like these ones:
 |
| These are from etsy.com but you can find them at any office supply store/scrapbook store. The ones we used were white. |
The names were printed on regular paper and glued onto a coordinating color of cardstock and both the flower and the name were attached to the bamboo skewers. I cut the "name" skewer so it was slightly shorter than the flower skewer to add a little bit of dimension.
Lastly, we scrounged up some dirt from our backyard (it doesn't take much to fill the pots) and both skewers were arranged in the dirt. Voila! Amazing little place cards that your guests can take home :)

other pictures from that evening:


--L
Aug 24, 2011
Party Time
Pretty sure I need to throw a party just so I can purchase these straws from Dime Store Buddy's Etsy store.

Yay fun!!
-M
Yay fun!!
-M
Aug 23, 2011
Oh hello! You are so helpful!
Just came across Pugly Pixel and she is fabulously helpful for all things related to blogging and design stuff and so cool!

There are tutorials and jazz...so. much. jazz.
I know this is the lazy woman's blog post but hey, at least it's up and semi-inspiring.
By the by, someone ordered chipboard. Somebodies will be crafting as soon as said chipboard comes in the mail.
-M

There are tutorials and jazz...so. much. jazz.
I know this is the lazy woman's blog post but hey, at least it's up and semi-inspiring.
By the by, someone ordered chipboard. Somebodies will be crafting as soon as said chipboard comes in the mail.
-M
Aug 18, 2011
a crafty project: prayer diaries
I have horrible blogging etiquette -- sorry for leaving without a moment's notice and then not posting for weeks! Horrible, horrible, horrible. Truth is, I quit my old job, took an trip amazing trip to Colorado Springs (which I have absolutely no photographic proof of other than one camera phone picture taken at an amazing BBQ joint in town--Rudy's any one??), then landed a better job, started training for the better job, got overwhelmed with training for the better job, started settling down into better job....and now I'm back!
I've been hoping to post a little tour of the humble, yet amazingly awesome studio that M and I use to construct our little creations but I was, and still am, having trouble tracking down the pictures so I'll save that for another time and give you guys a little crafty tutorial.
This project stemmed from the idea that I wanted to create something unique, meaningful, and useful for my friends graduating from Bible school back in June. I came up with the idea to create a prayer diary similar to the ones they were required to use and write in daily while in school but with some modifications. My idea was to create a prayer diary where my friends could keep track of when and how many times they prayed for a particular thing and how/when that prayer was answered. I thought it would serve as a good reminder to persevere in prayer as well as a great way to look back and see what the Lord has done in your life and in other's lives.
It turned out to be easier to create the pages on Microsoft Word versus Photoshop since I'm very much a Photoshop n00b and I didn't have enough time or patience to try to figure that out. Microsoft Word is actually a very versatile program and I was able to create all of the pages fairly simply using mostly shapes and text boxes. The finished product ended up looking a little something like this (except the finished product actually has a bottom half...why the screen shot cut it off, I don't know...me and screenshots aren't getting along right now):
In addition to those, I created pages that had space for them to write verses they enjoyed, passages they read, or any other form of enlightenment they wanted to jot down to look back on later.
After all of the pages were created, I had them printed at a CopyMax because it was a (seemingly) simple job that didn't need any special paper or color. In actuality, it turned out to be an incredibly frustrating endeavor due to some trimming errors they made, which left me in tears on a couple of occasions (being sleep deprived, short on time and having my own paper cutter snafu didn't help, either) but it all sorted itself out and overall, I learned a lot for next time.
For the covers of the prayer diaries, I used 5x7 chipboard and covered them in scrapbook paper using PVA/bookbinding glue. Do not, I repeat, DO NOT use plain Elmer's white glue or any other kind of liquid glue unless you like having bubbles and ripples on your covers and that's the sort of effect you're going for. Double-sided tape also seems to work well, but M and I have become experts at the other stuff so we tend to use the glue. I usually use a foam brush to apply the bookbinding glue and a brayer or a bone folder to get rid of any creases/wrinkles once the paper has been applied
 After the covers were complete and the prayer diary pages were in order, I used The Cinch (amazing little contraption) to punch the holes and bind the book for a professional finish.
Overall, I'm super excited about how they turned out (minus the trimming errors made by CopyMax) and I would definitely make these again in the future. With the cost of supplies and printing they turned out to be around $6 a piece--a pretty good deal considering how unique they are as a gift.
I received a sweet little thank you note from one of the recipients of the books that said "Thank you so so much for the super awesome prayer diary/journal! I had just been thinking about how to create my own version of the trusty blue books...and lo and behold, you've already done. So, I couldn't have asked for a more perfect gift. I am looking forward to getting lots of use out of it in the coming year." I'm so glad they're already coming in handy!
The finished product (one of seven):


--L
I've been hoping to post a little tour of the humble, yet amazingly awesome studio that M and I use to construct our little creations but I was, and still am, having trouble tracking down the pictures so I'll save that for another time and give you guys a little crafty tutorial.
This project stemmed from the idea that I wanted to create something unique, meaningful, and useful for my friends graduating from Bible school back in June. I came up with the idea to create a prayer diary similar to the ones they were required to use and write in daily while in school but with some modifications. My idea was to create a prayer diary where my friends could keep track of when and how many times they prayed for a particular thing and how/when that prayer was answered. I thought it would serve as a good reminder to persevere in prayer as well as a great way to look back and see what the Lord has done in your life and in other's lives.
It turned out to be easier to create the pages on Microsoft Word versus Photoshop since I'm very much a Photoshop n00b and I didn't have enough time or patience to try to figure that out. Microsoft Word is actually a very versatile program and I was able to create all of the pages fairly simply using mostly shapes and text boxes. The finished product ended up looking a little something like this (except the finished product actually has a bottom half...why the screen shot cut it off, I don't know...me and screenshots aren't getting along right now):
 |
| Has space for the prayer and in the grid they can mark the dates they prayed for that particular thing. Clever :) |
After all of the pages were created, I had them printed at a CopyMax because it was a (seemingly) simple job that didn't need any special paper or color. In actuality, it turned out to be an incredibly frustrating endeavor due to some trimming errors they made, which left me in tears on a couple of occasions (being sleep deprived, short on time and having my own paper cutter snafu didn't help, either) but it all sorted itself out and overall, I learned a lot for next time.
For the covers of the prayer diaries, I used 5x7 chipboard and covered them in scrapbook paper using PVA/bookbinding glue. Do not, I repeat, DO NOT use plain Elmer's white glue or any other kind of liquid glue unless you like having bubbles and ripples on your covers and that's the sort of effect you're going for. Double-sided tape also seems to work well, but M and I have become experts at the other stuff so we tend to use the glue. I usually use a foam brush to apply the bookbinding glue and a brayer or a bone folder to get rid of any creases/wrinkles once the paper has been applied
Overall, I'm super excited about how they turned out (minus the trimming errors made by CopyMax) and I would definitely make these again in the future. With the cost of supplies and printing they turned out to be around $6 a piece--a pretty good deal considering how unique they are as a gift.
I received a sweet little thank you note from one of the recipients of the books that said "Thank you so so much for the super awesome prayer diary/journal! I had just been thinking about how to create my own version of the trusty blue books...and lo and behold, you've already done. So, I couldn't have asked for a more perfect gift. I am looking forward to getting lots of use out of it in the coming year." I'm so glad they're already coming in handy!
The finished product (one of seven):


--L
Aug 10, 2011
Sneak Peek
So that long-term summer project was shortened a wee little bit. Little Green Notebook is hecka inspiring so I started one little project of the long term project.
It's going to involve this wallpaper:
Heck yes.
-M
It's going to involve this wallpaper:
 |
| Source: Hygge & West |
-M
Aug 8, 2011
Hello, I'm Kate and I'm Awesome
Oh Joy! just did a sneak preview of Kate Spade's Holiday Collection (see here). Yes, I want all of it.
Or maybe I could just start with this little guy instead:
Right.
-M
Or maybe I could just start with this little guy instead:
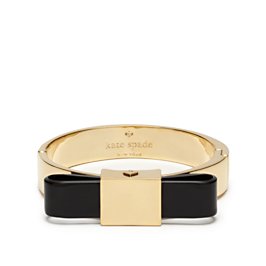 |
| Source: Kate Spade |
Right.
-M
Aug 7, 2011
It's L's Day and M's Postin'
Bad blogger, bad, bad blogger. One shouldn't miss 3 posts before posting 1 post...The math isn't right.
You're going to get a lot of M because L has been out of town. Sorry dudes.But to make up for it, I'll try to post more project-y, stuff we're working on either together or apart.
The list of stuff I'd like to do in my life of DIY fashion is extensive. So, here's one project. Let's look at this as long term....next summer term...ish...maybe.
I am currently trying to figure out the work space in my bedroom. Currently (as you can see), the desk functions as a large shelf on legs (no storage). It's a laundry-hamper-important-enough-paper-pile-stuff-in-general place. My chair is sometimes in the room and sometimes it's outside the room for extra seating. Clearly, it's not exactly used. It's just not comfy!
Taking a page out of Little Green Notebook's blog and her home office (This woman is freakin' amazing. And she might be Arizonan too. Woot woot!), I was inspired to do something similar.
I like the way she painted her desk and then the bars too. So, I will probably do something similar but I'm not sure what. It's this IKEA desk.You can imagine a before/after here:

As for the rest of the room. I like this bedding from West Elm (Eep! Pricey!). Ideally, I want a rug from my favoritest place, Anthropologie, but it's not gonna work for the price of $100 (for a 3 x 5!). So, I went to look at Urban Outfitters and found some much better priced rugs, which is what I have below. Finally, the little drawers are also from IKEA and it would go under this desk. I decided that I wanted to cover the front of the drawers with the wallpaper there (Imperial Trellis by Kelly Wearstler)


And there it is. The corner of my room will be decorated as such. If and when this project gets started, I'll be sure to post pics. But remember, llloooonnnnggg term. :D
Sorry for the delay! I'll try to get some more stuff up later. We finally got started on another book so I'll show you all the progress of that soon.
Ta ta for now!
-M
PS Look at who made it on Yahoo's American's Best Ice Cream Places list: Sweet Republic!
Jul 26, 2011
Etsy Shop Attempt 1
My camera needs cleaning; please pardon the fuzziness. As I've mentioned before, we are flying-by-the-seat-of-our-pants, make-it-work, of-the-moment, kind of folk. So, sometimes the supplies and equipment are a little not quite there. But we try.
This busy-ness that you all have been hearing about, what is up with it anyways? I will share.
This busy-ness that you all have been hearing about, what is up with it anyways? I will share.
The story continues after the jump!
Dream a little dream....
I wish, I wish, I wish, I wish....I could attend Blogshop one day.
PS. This isn't the real post for today. It's an amuse-bouche. Look for the real one sometime late this evening.
 |
| http://blogshopla.wordpress.com/ |
PS. This isn't the real post for today. It's an amuse-bouche. Look for the real one sometime late this evening.
Jul 24, 2011
Living Social #190 Best Escape on a Hot Day?
I am late. I am sorry. What if we made this a Monday thing? Anyways, here goes:

Sweet Republic is sweet, sweet bliss. Opened by a local couple here in the Valley, they’ve developed some bomb-tastic flavors (I realize the use of the word ‘bomb’ is showing my 90’s child colors, but see how I’ve reinvented it? It’s almost legit). While they are located quite a ways from where I frequent, but it’s totally worth the trip. I’m already scheming how to get back up there for some mas.
The flavor they are known for is the Salted Butter Caramel. But they also had neat flavors like jalapeño avocado and a watermelon sorbet (that tasted like watermelon and not a Jolly Rancher!) Some free add-on are also sea salt (which was black! I asked them why and the ice cream folk didn’t know either, but they said it was probably imported and expensive. Please note that ice cream folk were not ice cream owners because that would’ve been embarrassing if they didn’t know) as well as sprinkles and one other that I can’t remember.
After sampling a few other flavors like the Honey Blue Cheese (I know, really? Really. The honey came through as strong as the blue cheese; and oddly it worked but not enough to get a scoop) and Almond Buttercrunch, I went with one scoop of the Almond Buttercrunch with sea salt on top. I should’ve gotten more…
 |
| Those fuzzy little black spots are actually grains of black sea salt. Hot fudge on the right with Almond Buttercrunch ice cream. So good. |
My friends also got some fun flavors too like the vanilla bean (so yum!) and coconut. But the funnest one of them all of was the toasted marshmallow topping! I wasn’t sure if they made the marshmallows in-house. They looked made because of the cut edges rather than fluffy store-round. At any rate, they toasted it right there for you with a fire-thingy and topped it on your ice cream. Big win.
So here it is, Living Social and living fun. Come play with me!
Loves,
M
Jul 21, 2011
a post by L
Hello, hello!
As M mentioned, I (L) will be blogging on Thursdays and since today is indeed Thursday, lo and behold, here are the humble beginnings of my blogging career. To give you a little insight into my personality, the only piece of advice that M gave me before starting this blog post was that I "may want to invent a sarcasm font and/or punctuation mark." Well, now you know. I'm afairly highly sarcastic individual but I'll try my best to alert everyone when that time rolls around since there is no universal sarcasm font and sometimes satirical humor is lost over the interwebs.
I'll probably be using my blog posts to bring you some things that inspire me (and hopefully inspire you, too), some DIY projects and how-to's on crafty things that I come up with and make in my "studio." Speaking of, I had every intention of giving you guys a li'l tour of the studio today but somehow this week managed to get away from me and all my best intentions flew out the window along with my spare time.
So instead, here's a little sneak peak of some posts to come to whet your appetite for my Thursday posts (please, please, please excuse the poor quality of the pics, a digital SLR camera has been on my "need list" for, pretty much, ever). Enjoy and see you next week!


 --L
--L
As M mentioned, I (L) will be blogging on Thursdays and since today is indeed Thursday, lo and behold, here are the humble beginnings of my blogging career. To give you a little insight into my personality, the only piece of advice that M gave me before starting this blog post was that I "may want to invent a sarcasm font and/or punctuation mark." Well, now you know. I'm a
I'll probably be using my blog posts to bring you some things that inspire me (and hopefully inspire you, too), some DIY projects and how-to's on crafty things that I come up with and make in my "studio." Speaking of, I had every intention of giving you guys a li'l tour of the studio today but somehow this week managed to get away from me and all my best intentions flew out the window along with my spare time.
So instead, here's a little sneak peak of some posts to come to whet your appetite for my Thursday posts (please, please, please excuse the poor quality of the pics, a digital SLR camera has been on my "need list" for, pretty much, ever). Enjoy and see you next week!


Jul 19, 2011
The Very First Post
If I don’t put this up, it will never come up.
Hello friends and family as I assume you would probably be the only folks reading this (for now)!
Welcome to the blog of L &M, a written exposition of L and M’s adventures in crafting, starting their own business, and having a good time in the beautiful desert of ‘zona.
I’m not really sure where to begin. So going back to my roots of elementary school, we’ll go with the 5 W’s of who, what, where, when, and why.
Who: Well, as stated earlier, we are L and M—two friendies who have been crafting since awhile. We can probably credit L’s mom who is quite the crafter herself and whose crafting space and supplies we tend to use (but always replenish and add). She passed on the crafty bug to us when we were both pretty young (elementary school) at least and I feel that L was just born with it. Our day jobs are pretty non-related to this business, which only prompts for antics, hilarity, and general confusion. However, we have always found ourselves crafting whenever there is the opportunity. So here we are. Bloggers, wedding planners, soonish-we-hope-to-launch Etsy shop, and friendies.
What: We aim to craft and not in the tricky sense (at least, maybe not at this moment). Our product line consists of organization items. A recipe keeper/book, planners, calendars, and some cute knicks and knacks. We just took on a wedding too, so we may be adding wedding planning to our repertoire.
As for this blog, we invite you to share in this journey (sorry to wax poetic) of starting up LMNOP. This could be amazing. This could also be a massive fail. Let’s hope for amazing.
Where: A desert wasteland in Arizona. So. Not. True. I’m hoping for all of my out-of-state friends that this blog will prove to you that where we live is a really neat place and you will come visit me. I would say “more” but you don’t even come. Just skip May through November…
When: Three posts a week. A post by me (M) and a post by L weekly should be expected. I will post on Tuesdays. L posts on Thursdays. Saturdays we will post our explore AZ with Living Social feature. It’s gonna be a good time.
Why: As a dear five year old once said, “Because because”. We like this stuff a whole lot and chances are likely (practically guaranteed) we’d do this even if we didn’t tell the whole world about it.
Thank you for reading and supporting! And welcome! See you soon!
-M
Subscribe to:
Posts (Atom)